| K&N AirCharger Performance Kit |
| Overview - Installation - Testing - Conclusion | ||
| Overview | ||
|
Those looking for increased performance from the 3.3 liter VG33E series Xterra (or Frontier) engine would do well to invest in the K&N AirCharger Performance Kit. The kit was recently released from K&N, and we had a chance to install and test it over 3000 miles. |
||
|
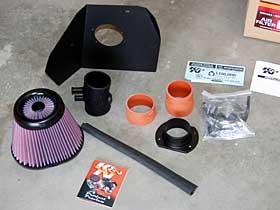
The K&N AirCharger Performance Kit (63-1032) contains:
For more information about this product visit K&N Engineering, Inc. K&N Installation instructions (PDF format) |
|
|
| Overview - Installation - Testing - Conclusion | ||
| Installation | ||
|
Installation can be handled by yourself in about an hour and a half with adequate tools. You will need a few metric socket wrenches, 8mm and 10mm and extensions. Pliers and side cutters will be useful.
|
||
|
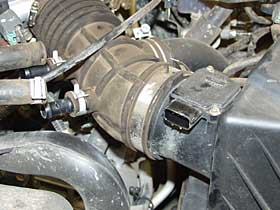
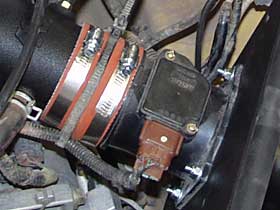
Removal With pliers, slide the hose clamps back off the intake tube and remove the air hoses. Remove the Mass Air Sensor (MAS) electrical connector carefully from the MAS. |
|
|
Disconnect the cruise control cable mounting bracket if so equipped from the top of the radiator. Loosen the hose clamp on the intake tube for the rear resonator box. Loosen the large hose clamps for that connect the intake tube from the throttle body. Unhook the 4 clips and remove the top of the stock air box, MAS and intake tube. |
|
|
|
Unbolt the bottom section of the stock air box and remove it from the vehicle. Remove the front air box support bracket. Unbolt and remove the front resonator tube. Remove the air temperature sensor from the front resonator tube and remove the rubber grommet from it. At this point you should have a very large space where the stock intake system used to reside. There are several holes in the front left fender, I chose to cover them with an adhesive backed plastic to stop any water from entering from underneath, off the tire. |
|
|
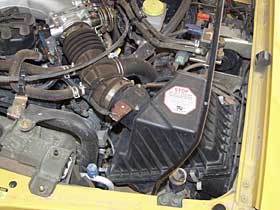
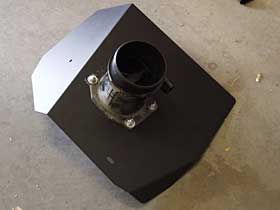
Installation The Mass Air Sensor is an important part of the intake system, and is used in the AirCharger kit. It is removed from the stock air box and bolted to the FilterCharger Adapter, and then bolted to the heat shield. Apply the rubber trim to the top edge of the heat shield and trim if necessary. Install the rubber mounting posts for the hear shield to the body of the vehicle. The heat shield will be attached to these posts later. From this point, the new intake tubing is attached to the throttle body. Don't tighten any fittings or hose clamps until everything is lined up. |
|
|
|
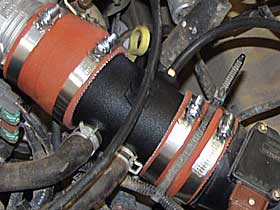
The new intake tubing is large diameter and smoother to allow increased air velocity and volume into the throttle body. Attach the larger silicone step tubing to the throttle body with a hose clamp. Attach the new intake tube to the larger silicone step tubing. |
|
|
Attach the smaller silicone step tubing to the Mass Air Sensor (which is attached to the heat shield). Place the heat shield into position and loosely attach it to the mounting brackets. Slide the silicone step tubing (with hose clamp) over the intake tube. Once the entire intake tract is assembled, reattach the air hoses and MAS electrical connector.
|
|
|
|
If your vehicle has a map/baro switch solenoid valve, install the brass pipe fitting and attach the intake tube. If not, insert the plug into the hole in the intake tube. Make sure everything fits, and that all hose clamps have a good grip around the silicone step tubes. Tighten everything down. Mount the cruise control (if equipped) cable bracket to the existing mounting hole with the supplied adapter bracket and stock bolt. |
|
|
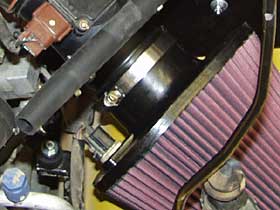
The final step is to install the actual FilterCharger air filter element. Slide the final hose clamp around the element, and slide it onto the air filter adapter on the backside of the heat shield with the air temperature sensor to the front of the engine bay. Tighten the hose clamp. Insert the air temperature sensor into the hole in the air filter element. |
|
|
|
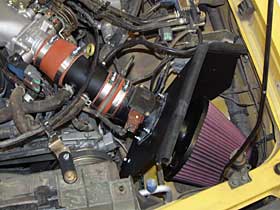
Finished Make sure everything is tight and lined up. Close the hood gently to check for any interference with the heat shield. The hood should just touch the rubber strip along the top edge. |
|
| Overview - Installation - Testing - Conclusion | ||
| Testing | ||
|
Testing has been ongoing since I installed the AirCharger on April 15th 2002. Since then I have logged almost 1000 on-road and off-road miles. My Xterra also has a CALMINI Performance Exhaust System installed. Performance is increased. Finally something that makes up for 32" tires and 500+ lbs. of gear on board. Down low, below 2000 RPM very little is felt, but above that, especially from 3000-5000 RPM the power increase is noticeable, and that's where I need it most for passing and climbing in the thin Colorado air. Mileage seemed to decrease at first, but that can be attributed to driving with my foot down to listen to the rumble of the intake. Mileage has averaged 17.631 MPG over the last 700 miles. Here's a breakdown of the last 3 tanks and a driving style estimate.
|
||
| Overview - Installation - Testing - Conclusion | ||
| Conclusion | ||
|
The K&N AirCharger Performance Kit can be found for as low as $225 at several online stores, and for the price it offers a good deal of performance. When paired with an aftermarket exhaust system it really shines. The only design drawback so far is the possibility of water getting to the underside of the filter. The heat shield does keep engine bay heat away from the filter, but can allow water to get splashed onto the filter from near the fan. I plan to add a sheet of metal or formable plastic below the heat shield to prevent this. The AirCharger is also not currently street legal. Once it passes testing K&N should be upgrading the product to their Fuel Injection Performance Kit (FIPK) product line. Look for an update to this review soon as my Xterra goes in for an emissions test. |
||
| Review by xoc June 3rd, 2002 | ||